
Recently, I was working on a browser based game that called for a randomized tile map. I wanted the map to look somewhat natural, but still be random on each play through. An easy way to accomplish this is to use a noise function to generate values which map to different types of terrain. In my implementation I went with Perlin noise which is a popular way to generate terrain.
What Is Perlin Noise
Perlin noise is a pseudo-random noise function that generates more realistic noise than one that is completely random. Basically, it takes into accounts the surrounding values so that you end up with a more gradual shift in values. This makes it great for things like terrain where you want it to gradually flow and not just have random values that stick out.
There’s a lot of great info on the formula for Perlin noise, I personally found this article to be very helpful to figuring it out. For the purposes of this we can skip the finer details, I’ve put together a simple implementation in Clojurescript that we can use for these purposes.
The Tileset
I’m using a simple tile set I found on OpenGamArt with a few modifications, you can find them below. The tiles themselves are unimportant to demo the functionality, so feel free to use another one if you want.


I’m defining them as plains, forest, desert, and mountains, and water. I’m also dropping this into a re-frame project, but it doesn’t rely on any of the functionality it provides so you should be able to follow along even if you have a different setup.
The Implementation
I decided to simply add the images to the DOM as HTML elements. You could just as easily do this in canvas, and it’s probably more performant, but I didn’t want to muddy things up here with the canvas specific code. So, we’ll just imagine a grid of DOM elements that are 16x16px (the size of our tiles) and 160x160 wide. Let’s set that up now, and we can include the script.
(:require
   [perlin2d :as perlin]))


[:div {:style {:width "2560px" :height "2560px" :border "1px solid black"}}
  (for [y (range 160)]
    [:div.Row {:style {:display "flex"} :key (str "x-" y)} ; this removes errors but isn’t unique
      (for [x (range 160)]
        (let [v (perlin/do-octave x y 8 0.05 0.8)]
          [:div.item {:style {:width "16px" :height "16px"} :key (str x "-" y)} ; same as above
          (get-tile-image (* (+ v 1) 0.5))]))])]
Here we have our DOM setup and generate 160 rows that are 160 tiles large. There are 2 functions here of interest perlin/do-octave and get-tile-image, let’s look at what each of those do.
Do-octave
If we look at the script for the Perlin implementation we have 2 key functions, the do-octave and perlin2D, which is incidentally called by the former. One of the issues with the base Perlin function is that it looks a little too smooth. We want the overall curve of the function to be smooth, but at individual points we want a bit more randomness because this looks a lot more natural.
That’s where do-octave comes in. It accepts an octave count, as well as a frequency and amplitude. The octave count tells the function how many times to run the perlind2D function which adds some more of this randomness. The amplitude and frequency also further add this and modify how likely extreme values are. You can change these values and you’ll see that the map generated takes on a different feel, experiment a bit to find values that work for you.
For our implementation we are calling this do-octave function for each point, which in turn will generate our noise value.
Get Tile Image
Now that we have our Perlin values we can use that to get our image value. One thing to note is that we are doing a little arithmetic to the value we get from the Perlin function. This is because we can get negative values, and this forces them to be positive.
Let’s take a look at the get-tile-image function:
(defn get-tile-image [v]
  (cond
    (> v 0.75) [:img {:src "/images/mountain.jpg"}]
    (> v 0.65) [:img {:src "/images/desert.jpg"}]
    (> v 0.55) [:img {:src "/images/forest.jpg"}]
    (> v 0.30) [:img {:src "/images/grass.jpg"}]
    :else [:img {:src "/images/water.jpg"}]))
All this does is look at the value passed in, and depending on that adds the image to the DOM. You can play with these numbers to make different results more or less likely depending on how you want to generate your world.
If you’ve set everything up correctly it should look something like:
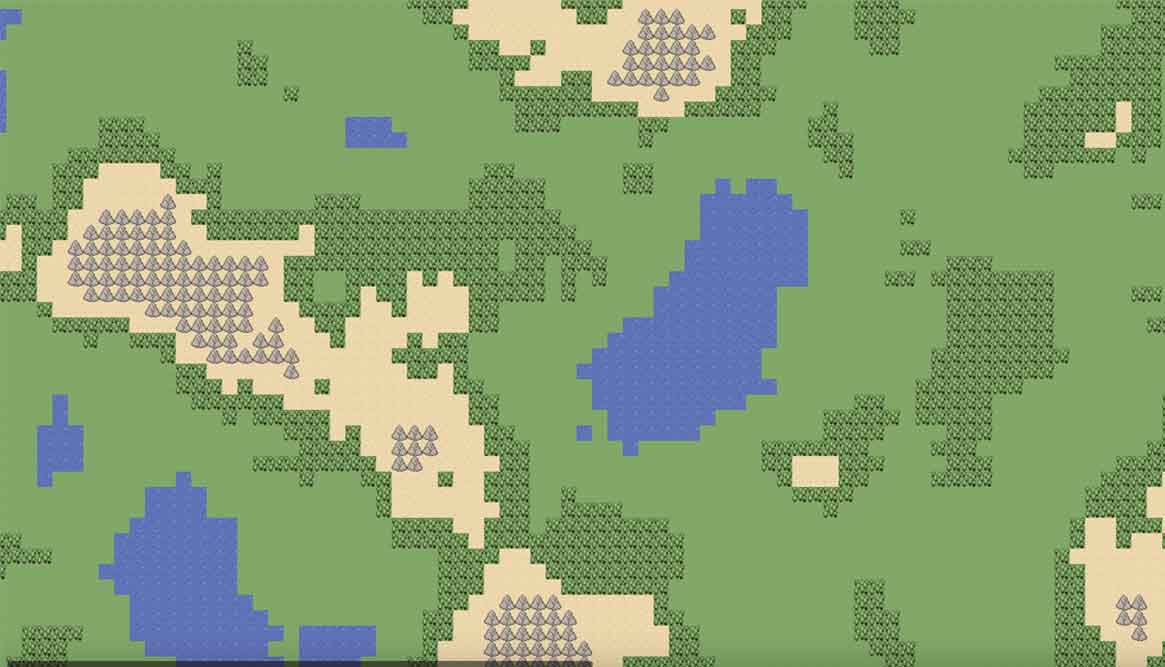
Note that it’s randomized each time, so you shouldn’t get the same exact map each time. There is a concept of seeding which will generate the same map for the same seed, but that’s beyond the scope here. My goal is randomized each time, so this works for my case.
Outside of that, you can always tweak the values for frequency, amplitude, octaves, and the thresholds for images to tweak the look of the map. Give it a go and notice how the map changes if you change the frequency to 0.1 for example.
With all that we’ve got a basic but working tile map generator. You can always further increase this by adding more tiles and setting up more rules for things like locations or other map features. Let me know if you enjoyed this article, or have any questions.